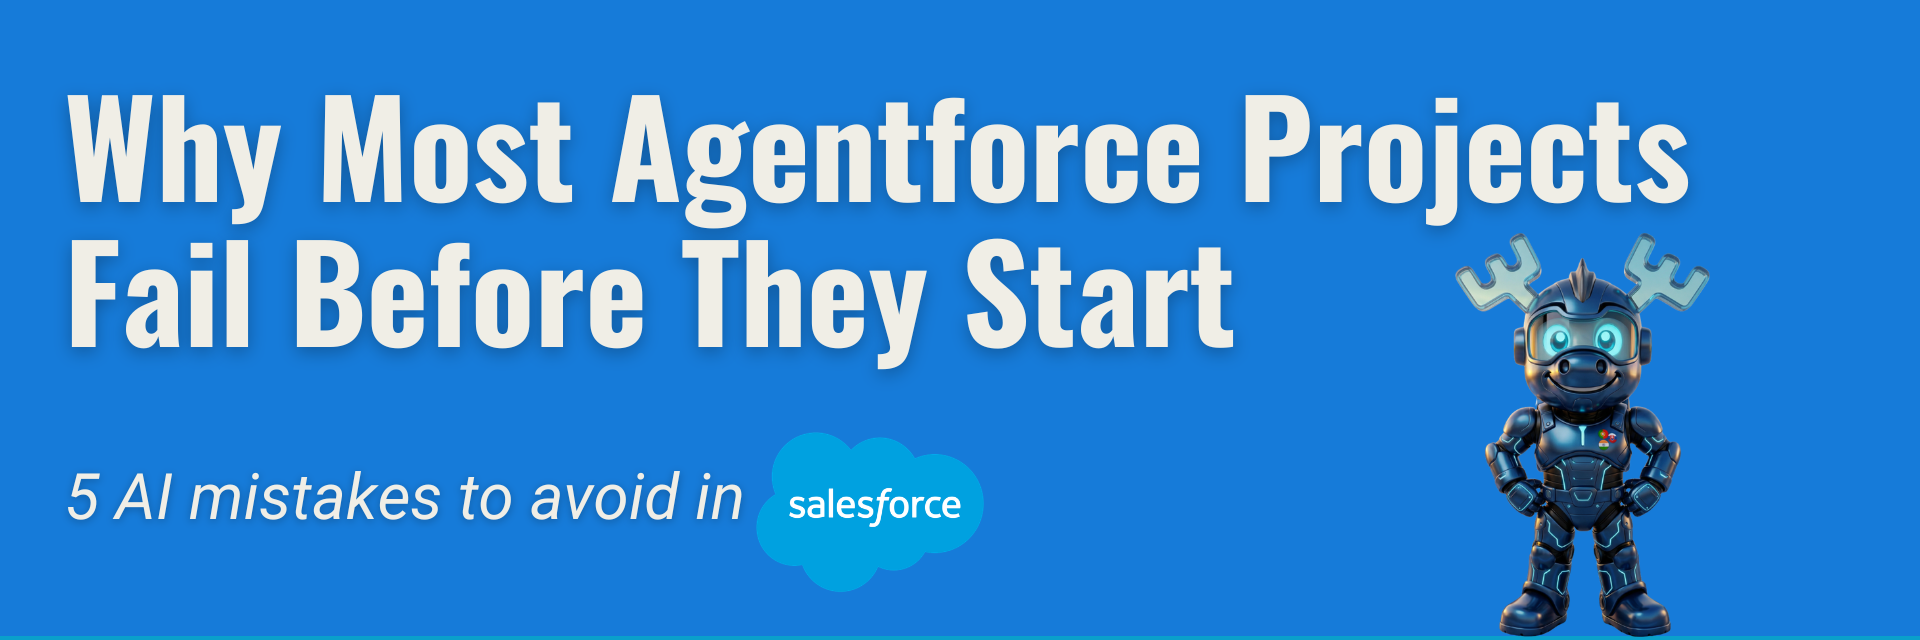
Why Most Agentforce Projects Fail Before They Start?
 Target Everest |
 5 mistakes companies make when introducing AI agents in Salesforce
Many companies are excited about Agentforce, but this is exactly why Agentforce projects fail if the organisation is not prepared. Companies expect immediate improvements in efficiency, productivity, and customer experience. Yet the biggest challenge is rarely the technology itself; it’s the readiness of the organization. In practice, AI rarely fails because the model is weak. It fails because the company asks it to work inside unclear processes, fragmented data, and systems that were never properly connected.
We often see Agentforce amplify both the strengths and weaknesses of an existing Salesforce environment. When the foundation is weak, AI doesn’t solve the problem, it exposes it.
Mistake #1: Why Agentforce projects fail when companies start with the tool instead of the business objective
One of the the most common mistakes is implementing Agentforce simply because it is new and widely discussed.
We recently worked with a company that wanted to launch Agentforce as quickly as possible because their competitors were already talking about AI.
When we asked what they expected it to do, the answers were vague:
- “We want to use AI in Salesforce.”
- “We want to automate something.”
- “We want to be more efficient.”
But there was no specific business objective behind the project.
It turned out the real issue had nothing to do with “using AI” in general. Their sales team was spending hours every week manually qualifying leads and writing follow-up emails.
Instead of launching a broad AI initiative, we focused on one concrete goal: reduce the time spent on lead qualification by 30%.
Only then did Agentforce become useful.
Before implementing AI, companies should first ask:
- Do we want to reduce response times?
- Do we want to improve lead qualification?
- Do we want to eliminate repetitive work?
Without a clear objective, even the most advanced AI will struggle to deliver measurable value.
Mistake #2: Why Agentforce projects fail when Salesforce data is poor
Agentforce depends entirely on the quality of the information stored in Salesforce. Duplicate, incomplete, or inconsistent records prevent the AI agent from providing reliable recommendations.
In one recent project, an AI agent was expected to support a customer service team.
The goal was simple: help employees answer customer questions faster.
The problem was that key customer information wasn’t stored in Salesforce at all. Previous interactions were hidden in email inboxes, complaint history was stored in Excel, and contract details lived in another system.
The agent wasn’t “wrong”, it simply didn’t have enough context to be useful.
As a result, employees quickly stopped trusting the recommendations because the answers felt incomplete or generic.
Typical data issues we see include:
- Missing customer or donor history
- Duplicate records
- Different versions of the same data across systems
- Unclear ownership of information
Many companies only realize these issues exist when an AI initiative exposes them.
By that point, the project is often delayed, and internal trust is already starting to disappear.
Mistake #3: Why Agentforce projects fail when companies try to automate everything at once
Many organisations try to transform multiple departments at the same time. Sales, customer service, marketing, reporting, everyone wants to be included from day one.
One company we worked with wanted Agentforce to:
- Answer customer emails
- Qualify leads
- Prepare reports
- Generate meeting summaries
- Support internal HR requests
All in the first phase.
The result? Nobody really understood what the project was supposed to do, deadlines kept moving, and users became frustrated.
Instead, we recommended starting with one small but visible use case: automatically summarising support cases before they were assigned to an agent.
Within two weeks, the team could already see the benefit. Response times improved, employees saved time, and trust in the solution grew naturally.
A more effective approach is to start small. For example, Agentforce can first be used to:
- Summarise support cases
- Draft follow-up emails
- Create meeting summaries
- Support repetitive internal tasks
Once users gain confidence, additional use cases can be added gradually.
Mistake #4: Forgetting governance and security
Employees need clarity on:
- What decisions Agentforce can make
- Where human approval is still required
- Who is responsible for the final outcome
We once saw a project where an AI agent was allowed to recommend discounts for customers. Technically, everything worked correctly, but nobody had defined the limits.
After a few weeks, the system started suggesting discounts that were far outside the company’s pricing policy. Employees didn’t know whether they were allowed to approve them, and managers blamed the tool.
The real issue wasn’t the AI. The issue was that nobody had established rules, ownership, or approval processes.
At Target Everest, we see AI as an extension of enterprise architecture. That means governance and security must come first.
Projects that overlook these fundamentals quickly lose user trust and fail to scale.
Mistake #5: Expecting employees to trust the system immediately
Even the best AI solution will fail if employees don’t trust it.
In one project, the company launched Agentforce across the entire support team overnight. The tool worked technically, but employees kept ignoring its recommendations. The tool worked technically, but employees kept ignoring its recommendations.
When we asked why, the answer was simple:
“They don’t understand where the answer comes from.”
People need time to understand:
- How Agentforce works
- Why it made a recommendation
- How they can use it in their daily work
The companies that succeed introduce AI step by step. They involve employees early, test the solution with a small group, and communicate openly about both the benefits and the limitations.
Trust is built gradually, not automatically.
Final thoughts
The companies that succeed with Agentforce are not necessarily those with the biggest budgets. They are the ones that:
- Prepare their Salesforce environment
- Define a realistic business goal
- Introduce AI gradually
- Create strong governance from the beginning
We have learned one thing repeatedly: AI will reveal both your strengths and weaknesses.
Prepare the foundation first, and only then expect the technology to deliver real value.
Before launching Agentforce, ask yourself one simple question: Are we solving a real business problem, or are we simply following the AI trend?
You can learn more about Agentforce on the official Salesforce website. Explore more articles on our blog!
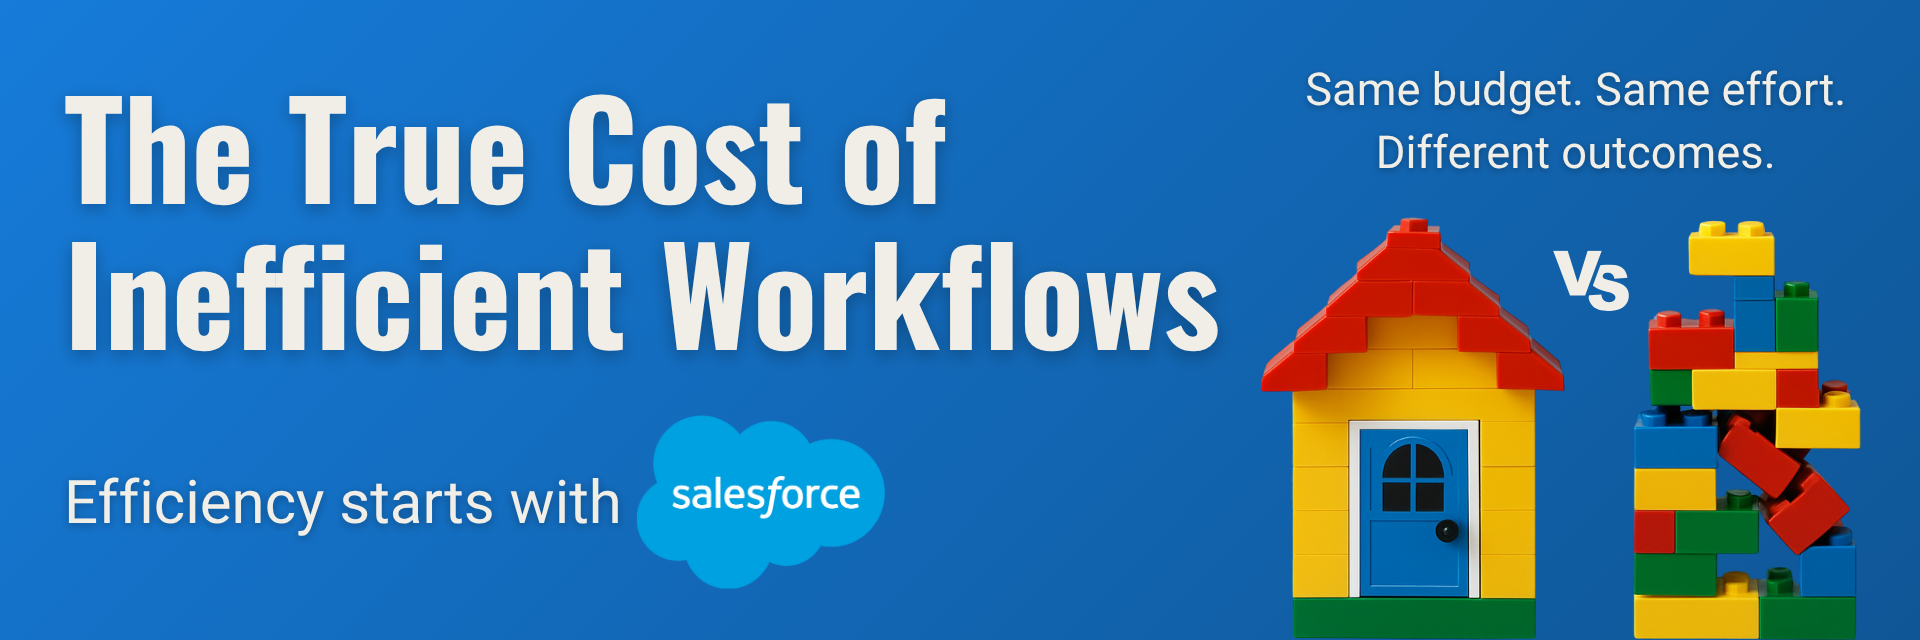
The True Cost of Inefficient Workflows
 Target Everest |
 What is the true cost of inefficient workflows?
Everyone talks about productivity. But few businesses ask what inefficient workflows are really costing them.
Inefficient workflows are one of the most overlooked costs in business operations. They don’t just slow teams down — they drain resources, delay decisions, and create friction across departments. In this blog, we explore what inefficient workflows really cost your business and how better systems can drive smarter, more scalable results.
From delayed approvals to lost leads, inefficient workflows can quietly drain time, money, and morale — without making much noise. The impact might not always be visible in a single report, but over weeks and months, the costs add up. And when they do, growth slows.
Let’s take a closer look at the hidden price of broken processes — and how automation can turn things around.
1. Wasted time: The most expensive cost you can’t see
Your team is smart and capable — but how much of their time is spent on repetitive, low-value tasks?
Whether it’s manually moving data between systems, tracking status updates across email threads, or recreating the same documents from scratch, time spent on busywork is time not spent on strategic priorities. Multiply this by your entire team, and it adds up quickly.
⏱️ A study by Salesforce found that employees spend 30% of their time on non-essential tasks that could be automated.
2. Slow responses = missed opportunities
Imagine this: A high-intent lead comes in, but your sales team only follows up two days later — because the lead wasn’t routed properly or got buried in someone’s inbox. The result? Opportunity lost.
In customer service, slow case routing or resolution can damage trust. In marketing, delays in campaign approvals can throw off entire timelines.
Speed matters. And inefficient workflows slow you down exactly when you need to act fast.
3. Errors and rework: When broken processes break everything else
Manual processes often lead to human error. Think of incorrect data entries, forgotten steps, or outdated versions of a document being sent to a client.
Every error means more time spent fixing mistakes, clarifying information, or redoing work — which impacts not just efficiency, but also customer satisfaction and brand reputation.
4. Team frustration and burnout
Few things are more demotivating than working in a system that feels broken.
When employees have to constantly chase information, navigate clunky tools, or repeat the same steps without understanding why, frustration builds. Over time, that leads to disengagement — and even attrition.
Efficient workflows aren’t just about performance. They’re also about making your team’s work feel meaningful and manageable.
5. Inefficient workflows = Lack of visibility and control
When processes live in spreadsheets, inboxes, or people’s heads, it’s hard for leaders to see what’s really happening. That makes it difficult to spot bottlenecks, measure performance, or optimize workflows.
Automation introduces structure and transparency. With Salesforce, for example, every step of a process can be tracked, measured, and refined over time — giving you better control over your operations.
From friction to flow: The case for automation
The good news? These challenges are solvable.
By mapping out your business processes and identifying points of friction, you can start to design smarter workflows that are:
- Automated (no more manual status updates),
- Standardized (everyone follows the same steps),
- Trackable (real-time visibility into what’s happening).
Salesforce Flow, for instance, allows you to create intuitive, no-code automation that eliminates repetitive tasks, reduces errors, and accelerates work across teams.
Real efficiency = time + clarity + focus
Efficiency isn’t just about doing more in less time. It’s about creating space for what matters: building relationships, making strategic decisions, and delivering value to your customers.
Every minute saved through automation is a minute gained for higher-value work.
Is it time to rethink your workflows?
If your team is drowning in manual tasks, moving slowly, or working with unclear processes — it’s costing you more than you think.
Businesses often underestimate the true cost of inefficient workflows — but recognizing and addressing them is the first step toward sustainable growth.
At Target Everest, we help businesses analyze, design, and automate their Salesforce workflows to unlock speed, structure, and growth. Let us help you turn friction into flow.
Explore more articles on our blog!
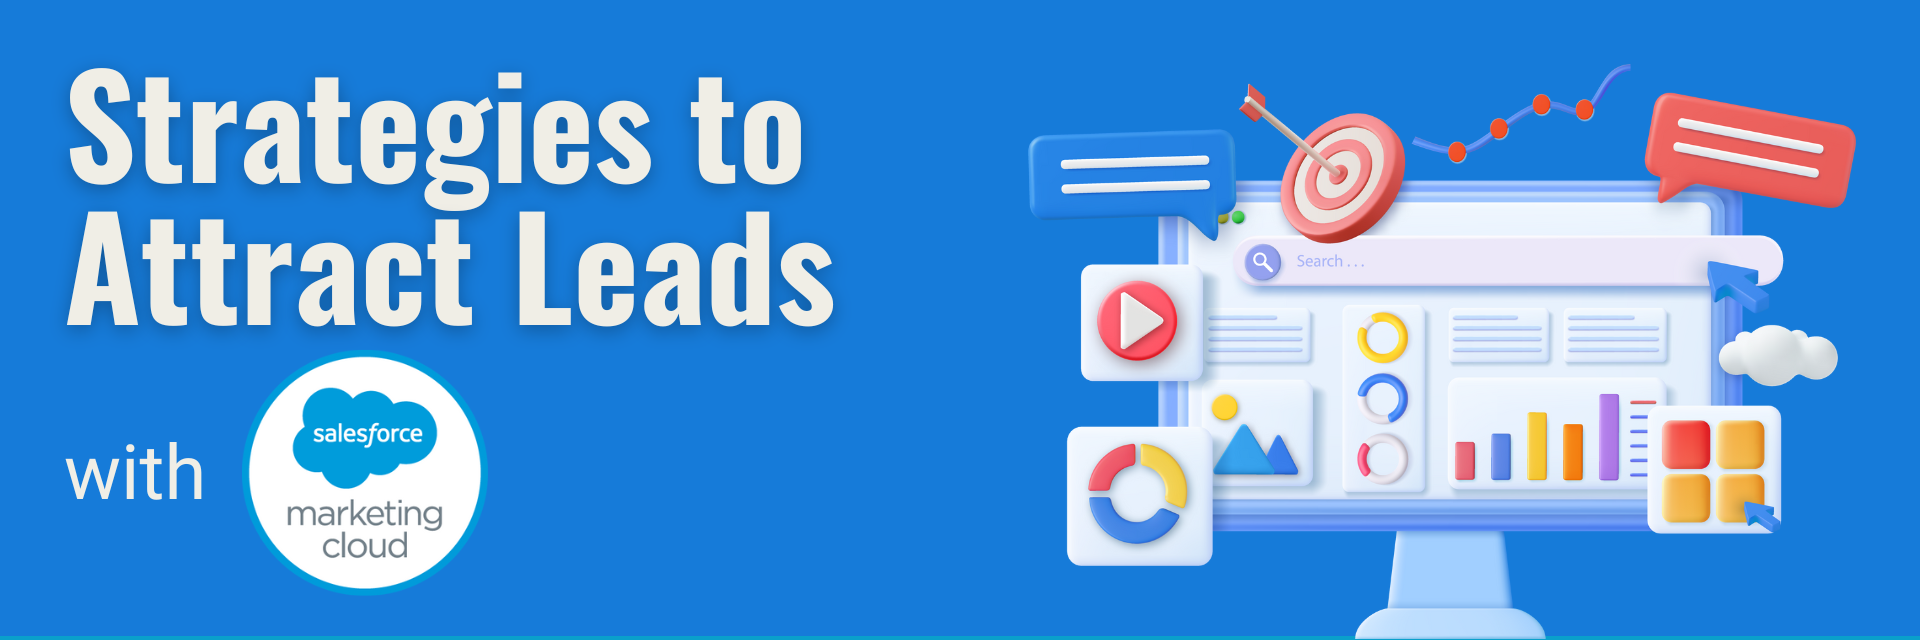
Effective Strategies to Attract Leads with Salesforce Marketing Cloud
 Target Everest |
 Generating high-quality leads is crucial for the success of any business — and Salesforce Marketing Cloud offers powerful tools to help make that happen. But how can brands leverage this platform to its fullest potential? From compelling design to strategic automation, here are some tried-and-tested strategies from the Target Everest team to help you attract and convert leads effectively.
1. Attractive Design and Strong Functionality
Create Landing Pages that Convert
A well-designed landing page is the cornerstone of any lead generation strategy. Focus on clear, concise messaging, intuitive layout, and a strong call to action. Make sure your forms are simple and user-friendly and remove any friction points that might stop a visitor from converting.
Use Engaging Visuals
Design isn’t just about aesthetics — it’s about experience. Use cohesive branding, strong visual hierarchy, and attention-grabbing imagery to draw users in. A visually compelling page helps build trust and guides the user through the journey.
Keep Accessibility in Mind
An often-overlooked aspect of design is accessibility. Ensuring your landing pages are inclusive — with readable fonts, high colour contrast, and screen-reader compatibility — not only broadens your reach but also improves user satisfaction and credibility.
2. Social Media as a Lead Engine
Promote Campaigns on Social Platforms
Social media is a natural extension of your Marketing Cloud strategy. Use it to raise awareness, promote downloadable content, or link directly to personalised landing pages. Targeted ads and organic content alike can drive qualified traffic to your funnels.
Create Content that Engages
From short videos to interactive polls, engaging content keeps your audience coming back. Focus on value — whether through educational tips, behind-the-scenes content or customer stories. The goal? Build relationships that eventually convert.
Build Trust Through Authenticity
Today’s audiences value transparency. Use social channels to humanise your brand — spotlight your team, share your process, and interact with followers in real time. These small touches foster connection and can lead to long-term loyalty.
3. Email Campaigns and Automation
Design Emails that Stand Out
Avoid clutter. Focus on mobile-friendly, visually consistent layouts with one key message per email. Compelling subject lines and well-placed CTAs will increase open rates and encourage clicks.
Automate the Journey
With Salesforce Marketing Cloud’s Journey Builder, you can guide users through personalised, automated experiences. Whether it’s a welcome series, abandoned cart flow, or post-download nurture track, automation helps maintain relevance and boost engagement.
Use Dynamic Content
Tailor your messaging to different audience segments using dynamic content blocks. With the right data in place, your emails can speak directly to each user’s needs, increasing both relevance and conversion rates.
4. Analyse and Optimise
Keep an Eye on the Data
Tracking performance in real-time is key. Use Marketing Cloud’s reporting features to monitor key metrics like open rates, click-throughs, and conversions. This helps you make informed decisions and pivot quickly.
Test, Learn, Improve
A/B testing isn’t optional — it’s essential. Experiment with subject lines, layouts, CTAs, and visuals to understand what drives the best results. Use those learnings to optimise future campaigns.
Don’t Forget the Long View
While short-term metrics are important, it’s equally critical to evaluate the broader impact of your campaigns over time. Monitor lead quality, customer lifetime value, and retention to understand how your efforts translate into sustained business growth.
5. Real Success Stories
Campaigns that Made a Difference
We’ve seen incredible results from clients using Salesforce Marketing Cloud to manage B2B and B2C campaigns. One hospitality client, for instance, used Einstein Bots to guide guests in real-time — easing pressure on customer service and improving the guest experience.
Team Tips
Our design and social media team recommend always aligning creative with clear KPIs. Less is often more, especially when your goal is to nudge someone towards a specific action.
Consistency is Key
Regular testing and optimisation are important, but so is consistency. Keep your branding, tone of voice, and visual language unified across every touchpoint to reinforce trust and build recognition.
6. What’s Next in Digital Marketing?
Stay Ahead of the Curve
AI-driven personalisation, voice search optimisation, and zero-party data strategies are shaping the future. Salesforce Marketing Cloud is already adapting to these shifts — and so should your strategy.
Adapt and Evolve
Marketing never stands still. Continuously investing in your team’s skills and technology stack ensures you’re ready for what’s next — and always one step ahead in attracting the right leads.
Want to learn more about how Target Everest can help your business grow with Salesforce Marketing Cloud? Let’s talk!
Explore more articles on our blog!
Salesforce Email-to-Case Tutorial
 Target Everest |
 What is Email-to-Case?
- Email-to-Case helps automate customer support by converting received emails from customers into cases and auto-populating fields for quick resolution. Email-to-Case on-demand service manages email traffic outside the network’s firewall and limits messages to 25 MB.
Email-to-Case Key Features and Benefits
- Seamless association of customer responses with original cases, including attachments, streamlining case management.
- Comprehensive case reporting tracks both inbound and outbound emails, providing insights into issue resolution processes.
- Flexible routing addresses enable the creation of multiple email addresses for converting customer emails into case fields.
- Integration with Assignment Rules, Escalation Rules, Workflow Rules, and Auto-Response Rules ensures smooth operation and enhanced efficiency.
Setup Email to Case in Salesforce with Microsoft 365
Before anything we have to set a couple policies in Microsoft 365 Admin
- Open the Microsoft Admin
- In Admin Centers Tab, go to Security
- In Email & collaboration tab, go to Policies & rules
- Here go to Threat policies
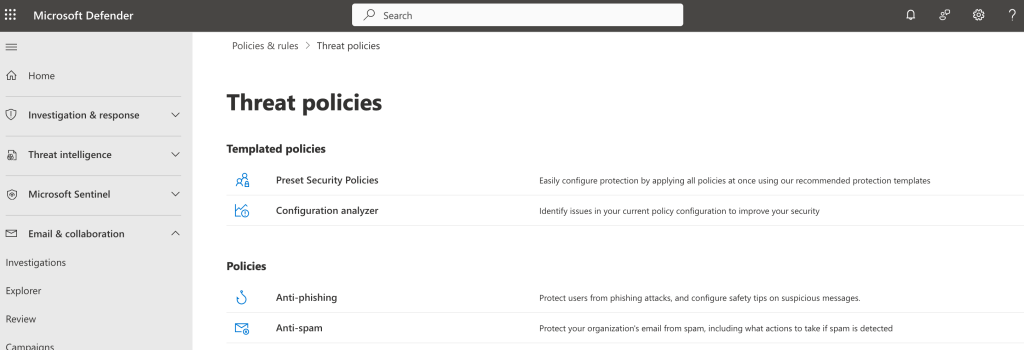
- Then Anti-spam policies
- In here click Create policy > Outbound
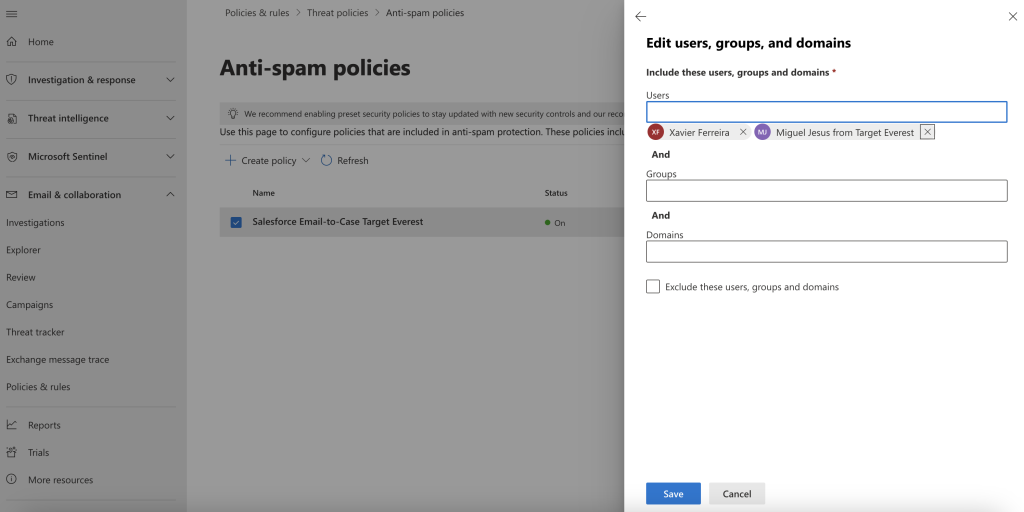
- Follow these Steps during Policy creation
- Set policy name accordingly
- Set user, group or domain to include on this policy
- On the Outbound Protection Settings, set the Automatic Forwarding Rules to “On – Forwarding is enabled
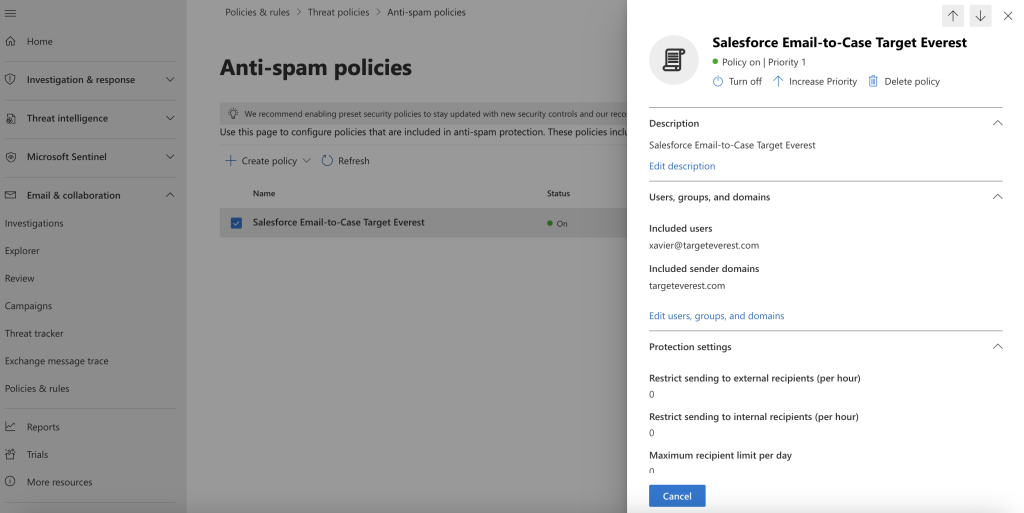
And we are done here!
Back to your Salesforce Environment
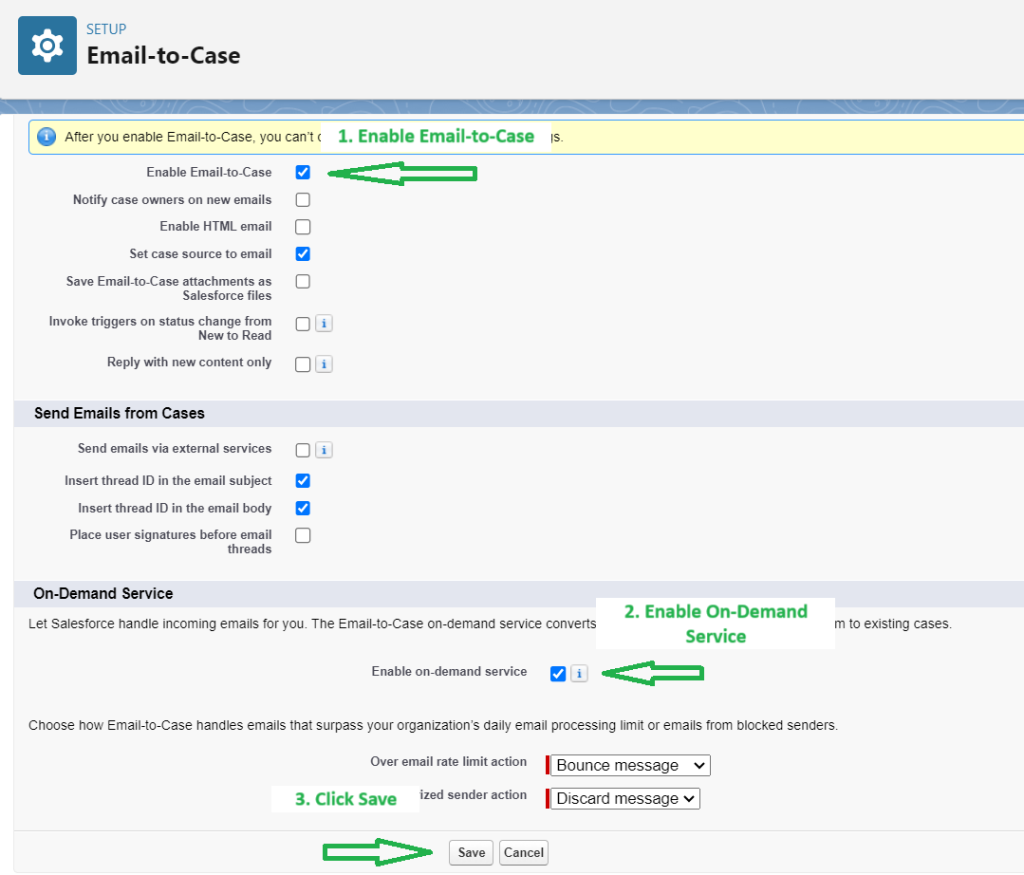
1. The first step is to enable Email-to-Case in Salesforce
- Go to Setup
- In “Quick find”, search and open “Email-to-Case” and click on the “Edit” Button
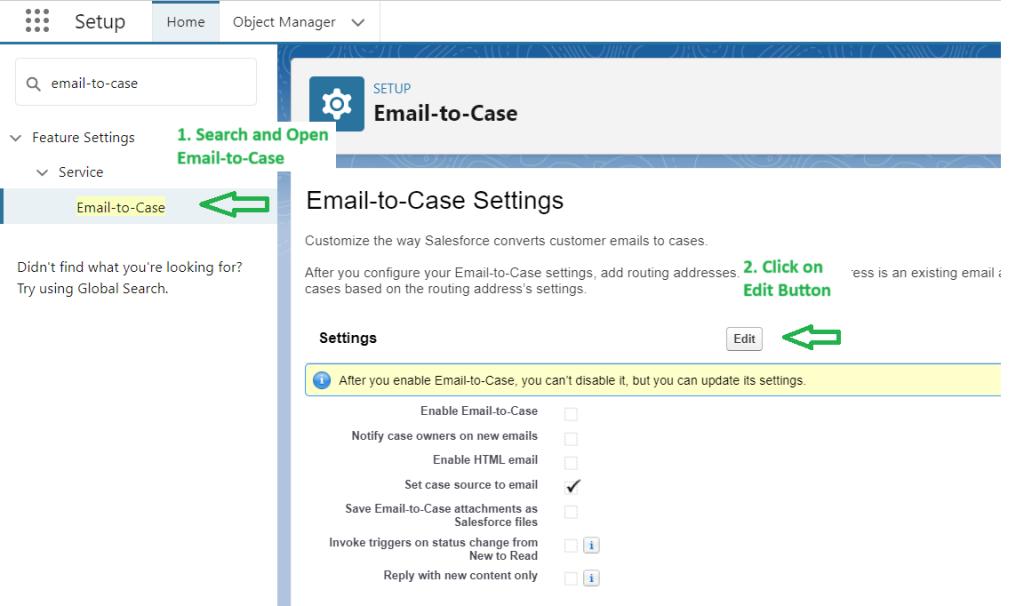
- Select “Enable Email-To-Case” and “On-Demand Service” then click on Save.
2. Next are the Routing Addresses for Email-to-Case
- Click on the “New” button from the Routing Addresses related list (at the bottom of the page)

- Define requirements:
- Set the Routing name for the Email-to-Case. The example used is “Exemplo Email To Case”
- Set the Email Address where the requests will be received. In this example the used email was “[email protected]”
- Check the “Save Email Headers” Checkbox in the Email Settings
- If you are the Owner, Under Case Settings, choose Queue in the Case Owner Dropdownlist and select the corresponding Queue.
If not, just select User in the Dropdownlist and Insert the User - Define the default case priority according to your needs. In this example we defined it as Medium
- Define the case origin. In this example we defined it as Email

- Click Save
After Finishing, Salesforce will send you an email to your Email Address to verify the email ID

- Salesforce will automatically create an email id for you.
Copy the generated Email Services Address meanwhile.

Setup Routing on the Email Provider
3.1. Setting Up Routing/Forwarding Rules is the next step with Gmail
Now it is time to configure our email forwarding setting at our outlook, Gmail, or email provider.
- Configure your email system to forward messages received at [email protected] to auto-generated service addresses.
As we are using Gmail for the demo. User Gmail Article for Automatically forward Gmail messages to another account- In your Gmail, click on the settings icon, See all settings.
- Then Click on Forwarding and POP/IMAP tab.
- Then click on the “Add a forwarding address” button.
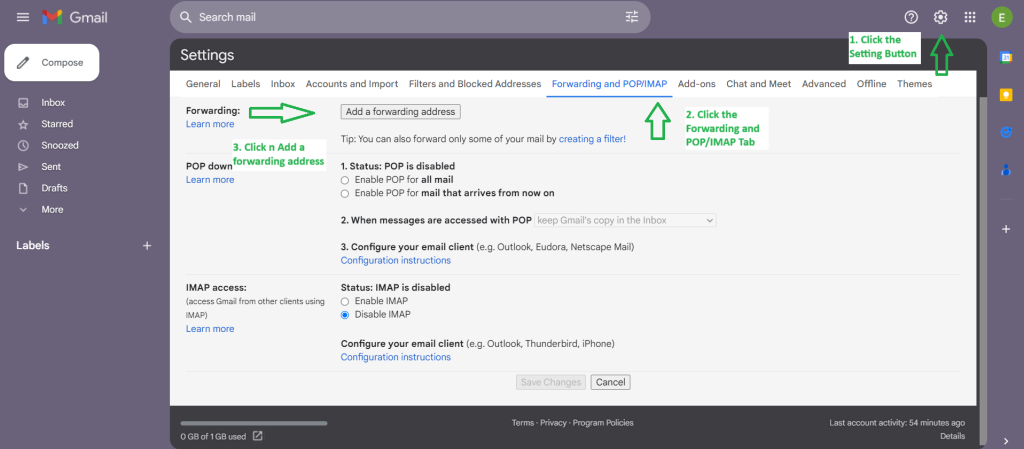
- Add forwarding address as the email provided by Salesforce.

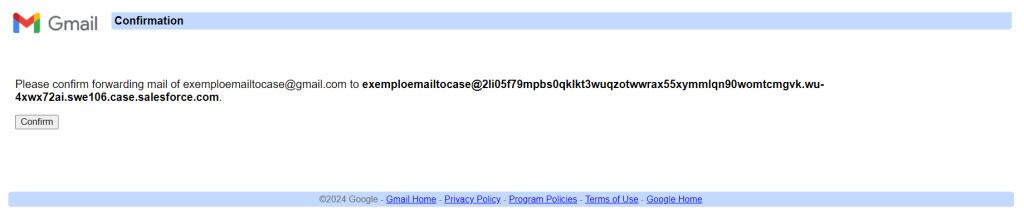
- With the email added, you will now see a Confirmation Screen saying forwarding email to auto-generated Salesforce email-to-case email ID.
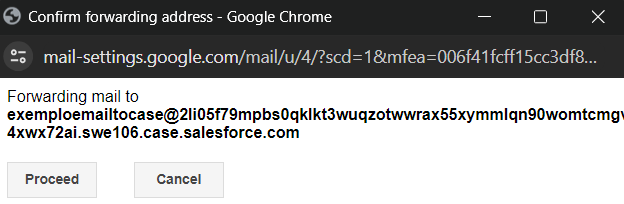
When you proceed, a new case will be created in Salesforce where you will have to open a link to confirm the forwarding email.
- Open the Salesforce case in Services and open the link. This means our email-to-case is working!
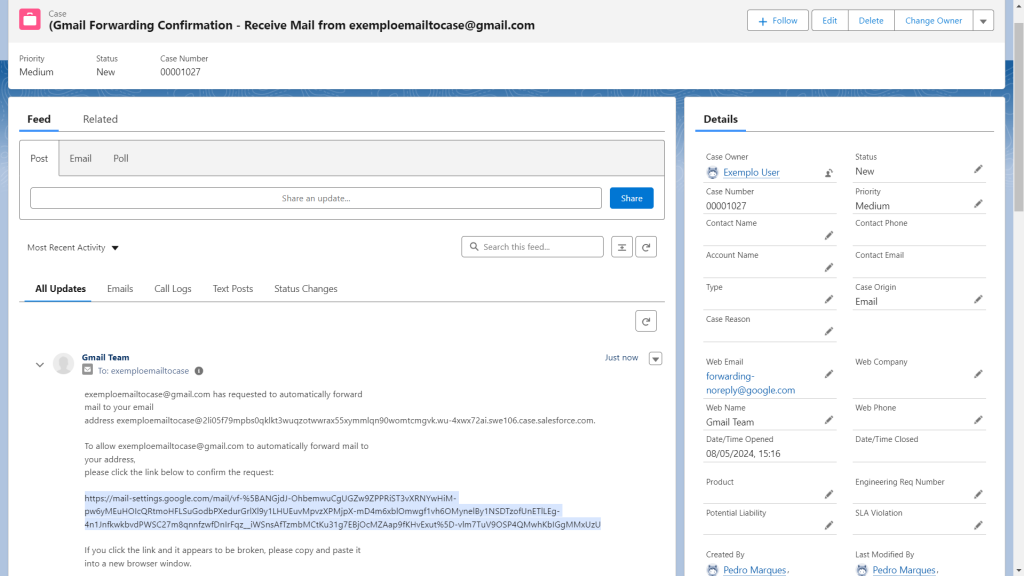
- After opening the link, click the confirm button to ensure the forwarding is set
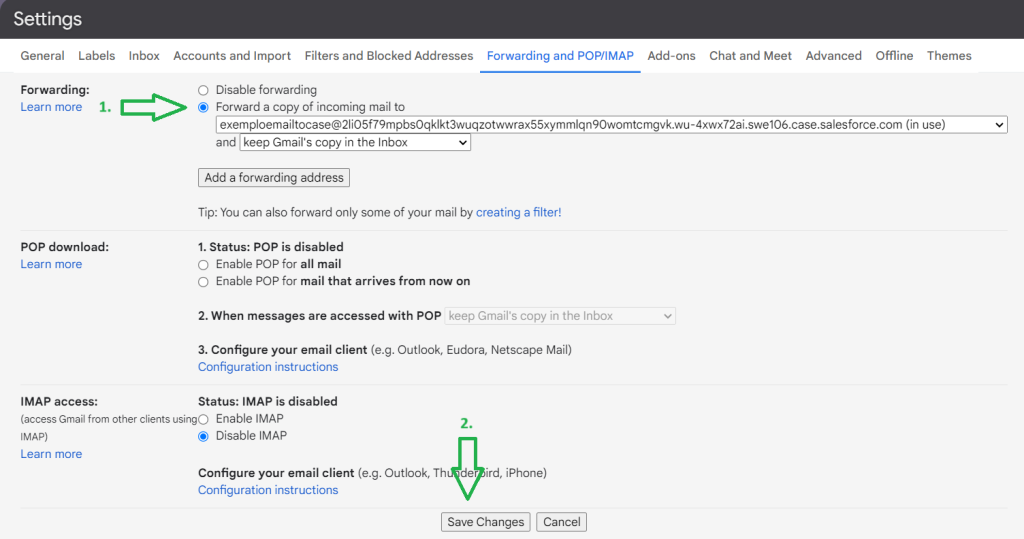
- With this done, our last step is to go to the Gmail Settings again, and turn the forwarding on for the email we just confirmed, then click Save
With this, we have concluded the Email-to-Case Setup using Gmail
3.2. Here we will show the steps for Outlook instead of Gmail
- Accept the request from Salesforce (an email is sent after creating and configuring email-to-case in salesforce)
- Now we have to Define the forwarding rule
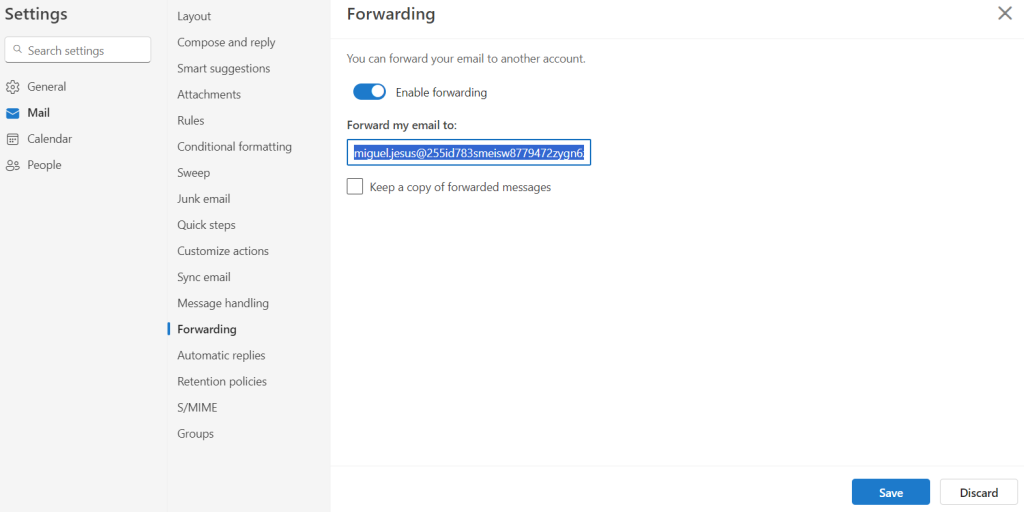
- Define criteria as needed for these configuration
- In action: Choose “Redirect to” and insert previously copied email
- Rule Name: SF Environment – Email-to-case – Account test
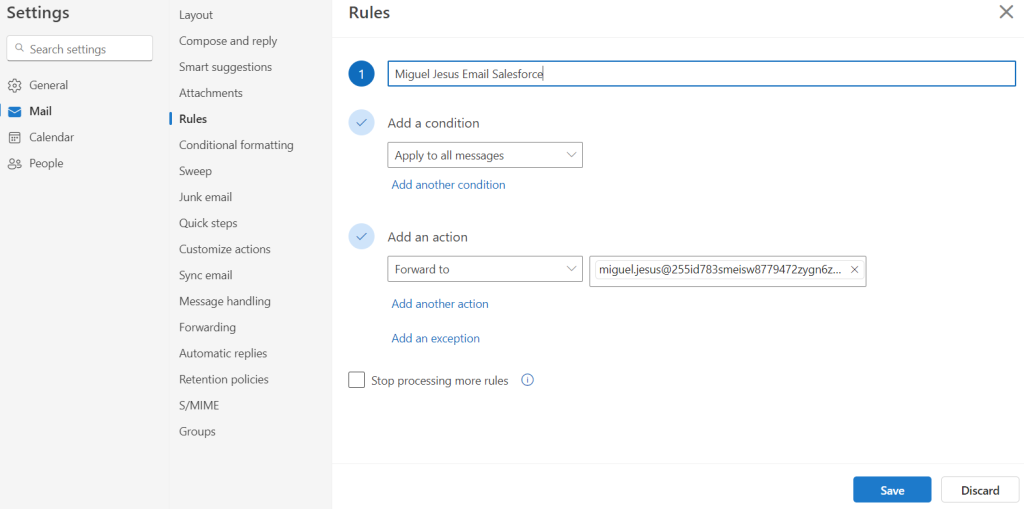
- (Ex: Forwarding Email – Email-to-Case – Account test)
Curious about Salesforce Email-to-Case? Fill out the form, and we’ll contact you shortly with more details!
Explore more articles on our blog!
Do you want to hear more?
Our team of experts specializes in Salesforce and is dedicated to providing top-notch services to help your business succeed. If you're looking for Salesforce® solutions or have any questions, please feel free to reach out to us. We'd love to hear from you.
Contact us